
You've applied for your India e-Visa. You've received your ETA. You've printed it, packed it, and you're ready to fly. There's one more step — and missing it can mean delays at immigration or being pulled aside at the boarding gate.
Since April 1, 2026, India requires all foreign nationals, including India e-Visa holders — to complete a digital e-Arrival Card before they board their flight to India. Paper disembarkation forms handed out on aircraft are gone completely. The e-Arrival Card is the only accepted method now, and it must be submitted online before you fly.
Why the India e-Arrival Card Was Introduced?
For decades, the blue paper disembarkation card was part of every international flight to India, handed out by cabin crew mid-flight, filled in hurriedly with a pen borrowed from the passenger next to you, and collected at the immigration counter on arrival. The system worked, but it was slow, error-prone, and generated enormous amounts of manual data entry at high-traffic airports like Delhi and Mumbai.
The e-Arrival Card is the result of India's IVFRT 2.0 program, the Ministry of Home Affairs' broader push to modernize the Immigration, Visa and Foreigners' Registration and Tracking system into a fully digital, real-time framework. The digital form was introduced in October 2025 as an optional alternative alongside the paper version. OCI cardholders were required to use it from October 1, 2025. The paper form was phased out entirely on April 1, 2026, making the e-Arrival Card mandatory for all remaining foreign nationals from that date.
The practical result has been measurable. Immigration processing times at major Indian airports have reportedly reduced by approximately 40% since the digital system went live, with automated QR code scanning replacing the slow manual data-entry process that paper cards required. For travelers, the upside is a faster immigration queue on arrival. The condition is completing a short online form before you board — not at the airport, not on the plane, but from home, at least 24–48 hours before your flight lands.
What Is the India e-Arrival Card? and Is It the Same as an India e-Visa?
NO and this distinction matters.
The e-Arrival Card is for arrival information, not a visa. It does not grant you permission to enter India. It does not replace your India e-Visa or any other visa. It is a digital pre-arrival declaration, the online replacement for the paper disembarkation card that was previously filled out on flights or at the immigration counter on arrival.
Both the India e-Visa and the e-Arrival Card are required. They serve entirely different purposes:
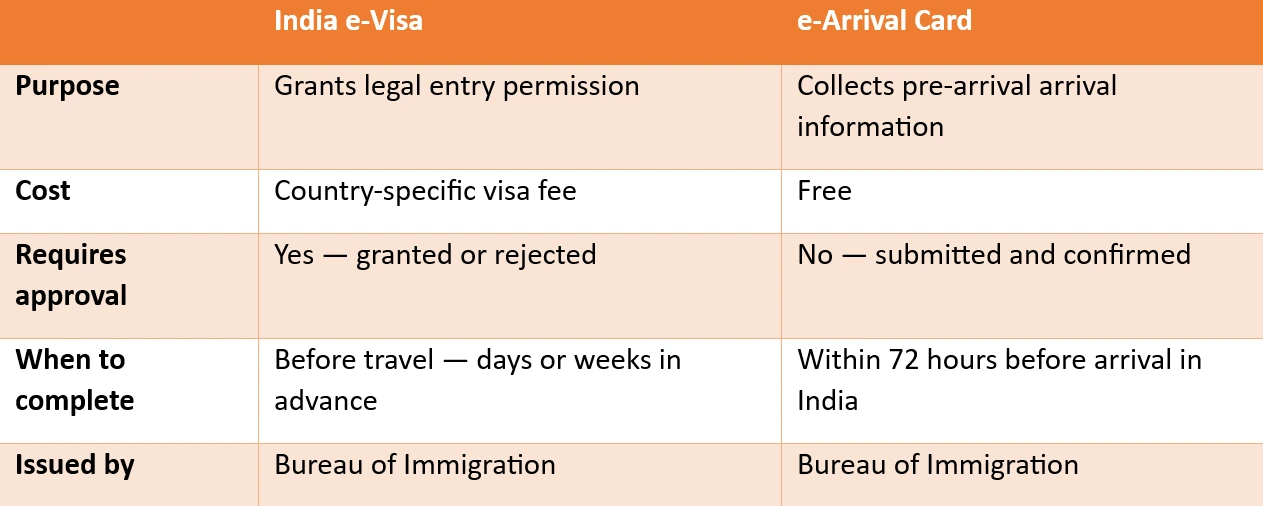
If you already have an approved India e-Visa, along with the passport of Switzerland, UK, Finland or any other eligible nationality, the e-Arrival Card does not replace it. You need all three: your passport, approved India e-visa and e-arrival card.
Who Must Complete the e-Arrival Card?
Since April 1, 2026, completing the India e-Arrival Card is mandatory for all foreign visitors and OCI cardholders entering India. This applies regardless of visa type: e-Tourist, e-Business, e-Medical, regular sticker visa, or visa on arrival.
Exempt from the e-Arrival Card: Indian passport holders only
For transit passengers: If you will be transiting in India and will remain airside, you do not need to fill out the e-Arrival Card. If you have to leave the airside transit area. For example, if you are travelling on different airline tickets or on a low-cost carrier, you will need to complete it.
When to Submit It? and Why Timing Matters!
The e-Arrival Card must be completed within 72 hours before your scheduled arrival in India, not earlier, and ideally not at the last minute.
Submission too early (more than 72 hours before) or too late (less than 24 hours before) may result in system rejection or verification delays. Airlines may check completion during check-in.
Recommendation: Complete it between 48 and 72 hours before your flight lands in India. This gives you enough buffer if you need to correct any details, and keeps you within the accepted submission window.
How to Complete the India e-Arrival Card
The e-Arrival Card is available through three official channels:
- The official Indian Visa Online portal
- The Bureau of Immigration website
- The official Indian Visa Su-Swagatam mobile app (available on Android and iOS)
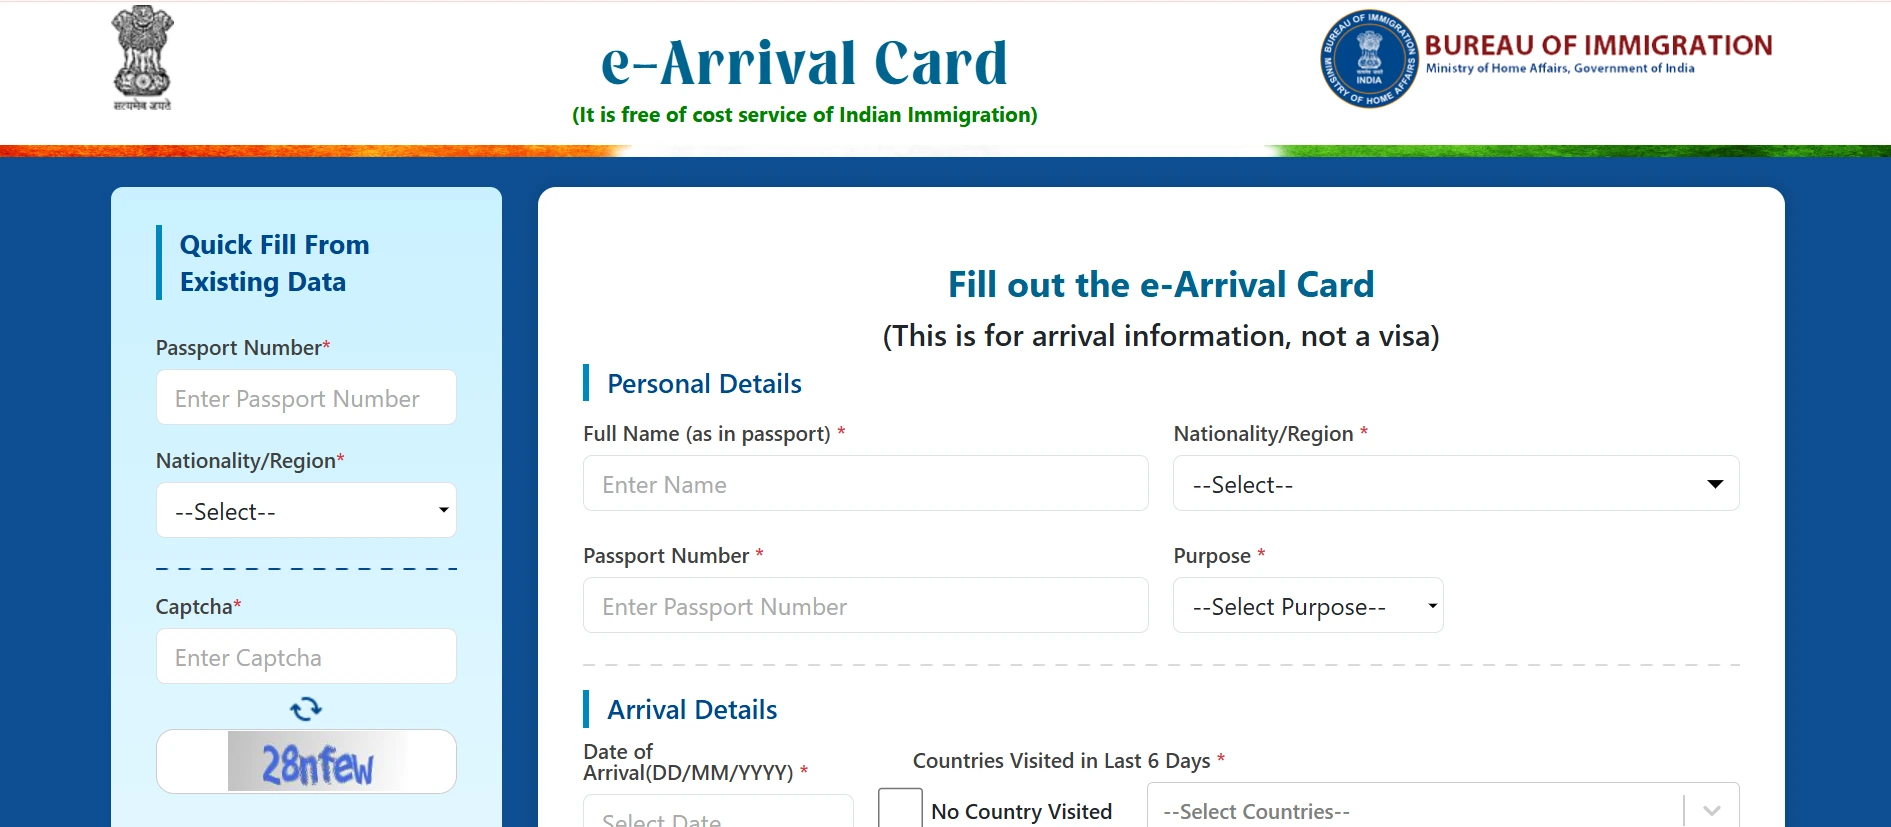
The form is free across all three channels. Any website or app that charges a fee for completing the e-Arrival Card is not an official resource.
A useful shortcut for returning travelers: If you've submitted an e-Arrival Card before, the portal has a Quick Fill from Existing Data option. Enter your passport number, nationality, and the captcha code shown, and the system pre-fills your personal details from your previous submission. You'll still need to update your arrival date, flight details, and current India address, but it saves significant time on repeat visits.
For first-time submissions, here's every section of the form in order:
Section 1 | Personal Details
- Full name: Enter exactly as it appears on your passport — including middle names if they appear there. Do not use nicknames or shortened versions. Even a small discrepancy between the form and your passport flags your entry for manual review at immigration.
- Nationality: Select from the dropdown. Choose the nationality of the passport you are traveling on, not a secondary citizenship if you hold dual nationality.
- Passport number: Copy directly from the bio page. No spaces, no dashes — only the characters as printed. Do not add MRZ filler marks.
- Purpose of visit: Select from the dropdown — Tourism, Business, Medical, OCI Homecoming, or the applicable category. This must match the purpose declared on your India e-Visa application.
Section 2 | Arrival Details
- Date of arrival: Your scheduled arrival date in India.
- Countries visited in the last 6 days: List any countries you have passed through or stayed in during the 6 days prior to your India arrival. If you traveled directly from your home country with no stops, select the "No Country Visited" option — do not leave this blank.
Section 3 | Address Details
- Address in India: Enter the full physical address where you will be staying — hotel name, street, city. "Hotel TBD" or "to be confirmed" is not accepted by the system. If you are on a multi-city itinerary, enter your first night's accommodation address. Book at least your first night before completing this section.
- State and District: Select from the dropdown menus — these must match the address you've entered above. A mismatch between the text address and the dropdown selections triggers a system validation error.
Section 4 | Contact Details
- Email address: Enter a valid, accessible email. Your QR code confirmation is sent here.
- Contact number: Enter with the correct ISD (International Subscriber Dialing) code for your country. The field requires a working number — enter your mobile number or the direct line of your hotel's front desk if you won't have a working number in India immediately on arrival.
- Emergency contact number: Optional but recommended.
Section 5 | Co-Travelers (if applicable)
If you are traveling with family members or companions, tap the Add Member button and enter their details within the same submission. Each traveler still needs their own individual entry in the form, but you can manage the whole group within one account session rather than creating separate submissions for each person.
Section 6 | Declaration and Submission
Enter the captcha code shown at the bottom of the form. Check the declaration box confirming all information is accurate. Review every field, particularly your name spelling, passport number, and arrival date, before tapping Submit.
After submission, a QR code is generated and delivered to the email address you provided. It is also available to download directly from the confirmation screen. Save it on your phone and print a physical backup; particularly useful if you are traveling to smaller airports where connectivity at the immigration counter may vary.
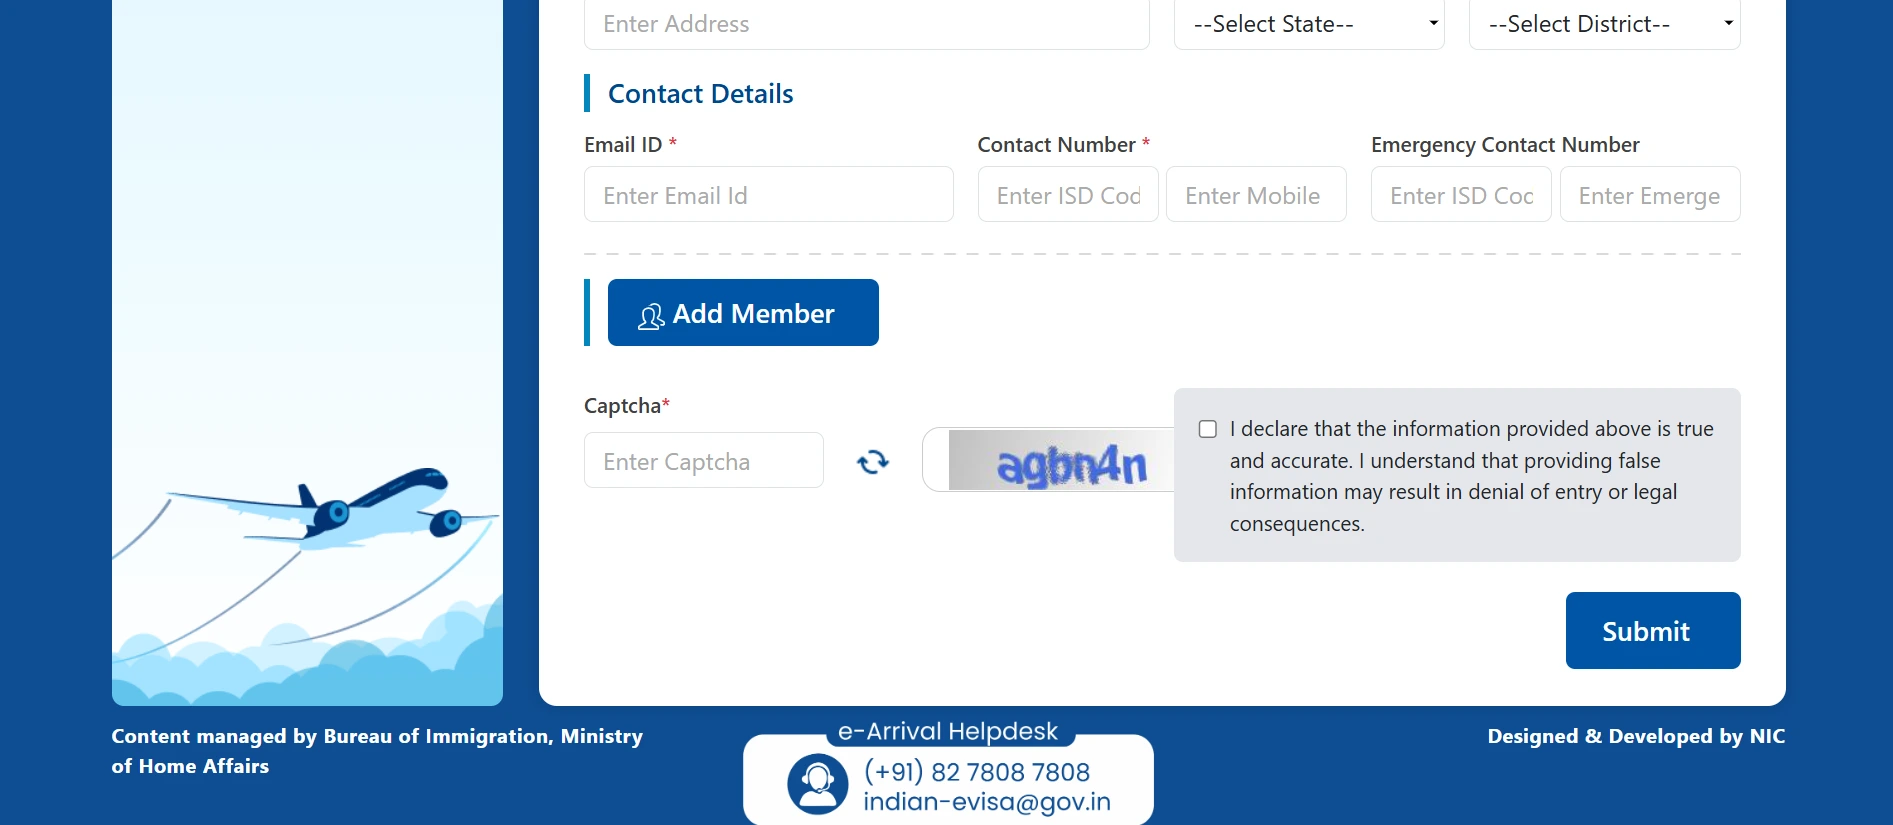
You may contact the e-arrival helpdesk in case of any technical issues or doubts faced in the midst of filling the form.
What If You Made a Mistake After Submitting?
This is one of the most common questions, and the answer is straightforward: you can resubmit.
If you notice an error after completing the e-Arrival Card, like a wrong passport number, a misspelled name, an incorrect arrival date, simply return to the portal or app, correct the details, and submit again. The system links submissions to your passport number and uses your most recent submission as the active record. The corrected resubmission replaces the earlier one automatically.
Make sure the corrected details match your passport and India e-Visa exactly before resubmitting. There is no penalty for resubmitting, and no limit on how many times you can do so within the 72-hour window.
Common Mistakes That Cause Problems; and How to Avoid Them
The e-Arrival Card takes under 10 minutes to complete. The mistakes that cause airport delays take even less time to make. These are the ones that come up most consistently:
❌ Name or passport number doesn't match the passport
The most frequent error across all nationalities. The form isn't a casual booking — it feeds directly into immigration systems that cross-reference your passport at the border. Copy every character directly from your passport bio page. Middle names that appear in the passport must appear on the form. Initials used on the form but not in the passport create a mismatch.
❌ Submitting more than 72 hours before arrival
The system will not accept submissions made more than 72 hours before your scheduled landing time. If you try to submit too early, the form is rejected. The practical recommendation is to complete it 24–48 hours before your flight — far enough from departure to correct errors if needed, within the accepted window.
❌ Entering "Hotel TBD" or a vague address
The address field uses automated validation. A non-specific entry like "hotel to be confirmed/decided" or "various locations" fails the system check. Book your first night's accommodation before completing the form, and enter its full address.
❌ Using a third-party paid service
The e-Arrival Card is free. Search results for "India e-Arrival Card" surface third-party websites that charge fees to submit the form on your behalf. These are unnecessary and sometimes fraudulent — the official portal and Su-Swagatam app are the only channels needed, both free.
❌ Assuming the airline will remind you
Some airlines check for the QR code at check-in or at the boarding gate as a passenger service. Some don't. You cannot rely on your carrier catching the omission — the responsibility is yours, not the airline's. Build the e-Arrival Card into your pre-departure checklist alongside your passport and visa check, not as an afterthought.
❌ Leaving the "countries visited" field blank
If you transited through another country in the 6 days before India, it must be listed. If you came directly from home with no stops, select the "No Country Visited" option. Leaving the field blank causes a form validation error.
The Su-Swagatam App: What It Does Better Than the Web Portal
Both the web portal and the Su-Swagatam app produce exactly the same QR code and submit to the same government system. For a single trip, the web portal works perfectly well. For travelers who visit India regularly, the app has one significant advantage: saved profile.
Once you've entered your passport details and personal information in the app, it stores them for future submissions. On your next trip to India, you open the app, update your arrival date and India address, and submit — without re-entering all your personal and passport details from scratch.
The app is available on both platforms:
- iOS: Search "Su-Swagatam" or "Indian Visa" in the Apple App Store. Verify the publisher is "National Informatics Centre" before downloading.
- Android: Search "Su-Swagatam" in Google Play Store. Same publisher verification applies.
Technical issues with the app are occasionally reported during high-traffic periods, specially Indian national holidays and long weekends are the most common times. If the app is unresponsive, the web portal is the immediate alternative, since both access the same underlying system.
What Happens If You Don't Complete It?
Missing the e-Arrival Card does not void your India e-Visa — but it creates problems at both ends of your journey. Without a digital disembarkation card, you may risk your entry to India or face boarding denial at the departure airport.
At Indian immigration, travelers without a submitted e-Arrival Card are pulled aside for additional manual processing — longer queues, additional questioning, and a significantly more stressful start to the trip. Given it takes under ten minutes to complete online and costs nothing, there is no practical reason to skip it.
The Pre-Departure Checklist!
Before you board any flight to India, confirm all three of the following are in place:
✅ India e-Visa ETA: status reads 'GRANTED', printed copy in hand
✅ e-Arrival Card: submitted within 72 hours of arrival, QR code saved
✅ Passport: same one used for the India e-Visa application, minimum 6 months validity from arrival date, at least 2 blank pages
Applying for your India e-Visa and want to make sure everything is in order before you fly?
IVC Visas reviews your India e-visa applications from all 175 eligible nationalities, so your ETA arrives correctly the first time. Once approved, our team can also guide you through the e-Arrival Card process and answer any pre-departure questions.
Contact IVC Visas if you got any queries!
Disclaimer: IVC Visas is an independent visa service provider. We assist with application preparation and submission to official government portals. Final visa approval decisions are made solely by Indian immigration authorities. All information is based on current regulations as prescribed by the Government of India, which may change. Always verify the latest requirements before travel.